
In this installation scenario, you select an ArcIMS Application Server Connector depending on the development environment you plan to use for creating Web pages. The available Application Server Connectors are ArcIMS Servlet Connector, ActiveX Connector, ColdFusion Connector, Java Connector and .NET Link Runtime and Developer Help.
The Application Server Connectors reside on the Web server computer. Each Web server can have more than one Application Server Connector, as long as they are of different types.
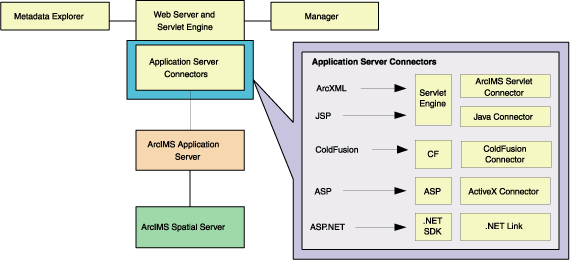
A connector consists of an I/O Communication library and an optional AXL Object library. The AXL Object library is exposed through the connector API and enables the connector to create and parse ArcXML requests and responses to the developer. Without the AXL Object library, all ArcXML requests and responses must be created and parsed manually. The Java Connector, ColdFuson Connector and ActiveX Connector include an AXL Object library. ArcIMS Servlet Connector and .NET Link do not include an AXL Object library.
The Servlet Connector is the standard ArcIMS connector. The typical installation installs this connector. You need this connector if you plan to administer Web pages or use the Web design tools in ArcIMS (Author and Designer). The Servlet Connector also provides MapService-level user password authentication. The WMS connector for ArcIMS is installed with the Servlet connector see the WMS connector section for steps to enable ArcIMS to work within the OCG WMS 1.1.1 specification.
Use the ColdFusion Connector if you plan to embed ColdFusion applications in your Web pages. The Java Connector communicates with the ArcIMS Application Server and a JSP client. The ActiveX Connector permits you to customize the ArcIMS Viewers with embedded ActiveX applications. The .NET Link Runtime and Developer Help allows you to integrate ArcIMS functionality within a .NET application.
See System requirements for requirements for the ColdFusion connector, ActiveX connector, Java connector and .NET Link Runtime and Developer Help.
|
Tip
|
Verify that your site meets the system requirements. For system requirement information see Step 1: Verify system requirements
Log in as a user with administrative privileges.
Ensure that a TEMP variable is set to a valid folder where you have write access and space available.
Close all applications on your computer.
Insert the ArcIMS CD into the CD drive to automatically launch the setup program.
|
Tips
|
During the installation you will be asked to read the license agreement and accept it, or exit if you don't agree with the terms.
At the Select Features dialog box, expand the Application Server Connectors feature by clicking on the + sign to view the sub-features. The Application Server Connector feature contains the ActiveX Connector, ColdFusion Connector, Java Connector, Servlet Connector and .NET Link Runtime & Developer Help sub-features. Click the dropdown arrow to the left of the Application Server Connector that you would like to install. From the list, select Will be installed on local hard drive to install the selected Application Server Connector.
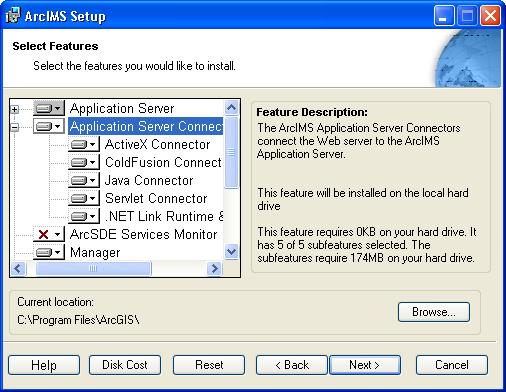
There are also Application Server Connector Documentation and Samples available to install. Expand the Samples features by clicking on the + sign to view the sub-features. Select Samples sub-features you would like to install, click on the dropdown arrow to the left of each feature. From the list, select Will be installed on local hard drive to install the selected Samples sub-features. Documentation is available from the ESRI Software Documentation Library CD.
|
Tip
|
To complete the installation, follow the directions on your screen.
|
Tips
VTML files are installed at <ColdFusion Studio Installation Directory>\Extensions\TagDefs\VTML Image files are installed at <ColdFusion Studio Installation Directory>\Wizards\Images Toolbar file is installed at <ColdFusion Studio Installation Directory>\UserData\Toolbars
|
Complete the post installation setup
The following ArcIMS post installation options are required to successfully install custom Application Server Connectors:
ArcIMS Configuration (includes ColdFusion Connector configuration if the ColdFusion Connector was installed)
Web Server-Servlet Engine Configuration
If you select a typical post installation setup these post installation options are automatically selected. See The Post Installation topic for information on the post installation setup options.
Additional configuration steps for custom Application Server Connectors
Before the installation is complete, configure the connector you installed:
|
Tips
|