
After installing the ArcIMS ColdFusion Connector, you must configure ColdFusion Server to work with ArcIMS. To use ArcIMS with ColdFusion, you need ColdFusion Server Professional or Enterprise, and you need ColdFusion Studio to create custom Web pages.
The ArcIMS ColdFusion 5.0 or earlier extension DLLs are installed at <ColdFusion Server Installation Directory>\bin. The ArcIMS ColdFusion MX extension DLLs are installed at <ColdFusion Server Installation Directory>\runtime\bin.
These files are aimsutil.dll, cfx_esrimap.dll, emaplink.dll, xerces-c_1_3.dll, icuuc.dll, icui18n.dll, and icudata.dll.
The ArcIMS custom element files are installed at <ColdFusion Server Installation Directory>\CustomTags.
These files are ai_QueryForm.cfm, ArcIMS.cfm, ArcIMS_FilterSQL.cfm, ArcIMS_Layer.cfm, ArcIMS_MultiPoint.cfm, ArcIMS_Polygon.cfm, ArcIMS_Polygon_Query.cfm, ArcIMS_PolyLine.cfm, ArcIMS_SQL.cfm, and ArcIMS_Text.cfm.
If the custom element files listed above are not in the location indicated, you can copy them from the ArcIMS ColdFusion Connector directory located at <ArcIMS Installation Directory>\ArcIMS\Connectors\ColdFusion under the CustomTags directory. Also copy the server bin files.
Open the ColdFusion Server administrator page. On the navigation bar, find extensions and click CFX_Tags.
Click OK on Register C++ CFX.
Type the following as the Tag Name:
CFX_esrimap
For the Server library (DLL), click Browse Server to navigate to:
For ColdFusion 5.0 or earlier <ColdFusion Server Directory>\bin\cfx_esrimap.dll.
For ColdFusion MX <ColdFusion Server Directory>\runtime\bin\cfx_esrimap.dll
Click Submit Changes.
Close the ColdFusion Server administrator page.
The design time control is a wizard that allows users to supply the parameters required for the elements and then generates the element code in the page. To add the control to the ColdFusion Studio toolbar:
If you had ColdFusion Studio installed prior to ArcIMS installation, CF_ARCIMS.vtm, CF_Arcims_layer.vtm, Point.vtm, and Text.vtm are at:
<ColdFusion Studio Directory>\Extensions\TagDefs\VTML.
The images used by the ArcIMS Custom Toolbar: aimslayer.bmp, aimsline.bmp, aimslogo.bmp, aimspnt.bmp, aimspoly.bmp, and aimssql.bmp are at:
<ColdFusion Studio Install directory>\Wizards\Images.
The ArcIMS Custom toolbar, ArcIMS.tbr, is at:
<ColdFusion Studio Install directory>\UserData\Toolbars.
If you did not have ColdFusion Studio installed prior to installing ArcIMS, then copy the files from the following locations to the locations indicated above:
VTML files: <ArcIMS Installation Directory>\Connectors\ ColdFusion\Studio
Image files: <ArcIMS Installation Directory>\Connectors\ ColdFusion\images
Toolbar files: <ArcIMS Installation Directory>\Connectors\ ColdFusion\userdata\toolbars
Open ColdFusion Studio to edit Tag Insight and Tag Completion.
a. Click the Options menu and click Settings. Click on Tag Insight.
b. Click Add, and type the following:
cf_arcims
Click OK.
c. Select Tag Completion.
d. Click Add, and type the following:
cf_arcims
Click OK. Click Apply to close the Settings window.
To create the ArcIMS toolbar, click the Options menu and click Customize. In the Visible Toolbars list, check ArcIMS. Click Close.
Dock the ArcIMS tool to the ColdFusion tag toolbar.
Open <ColdFusion Studio Directory>\Extensions\ MarkUpTags.vtm in a text editor. After the line <CAT CAPTION=’Custom Tags,’ add the following:
<CAT CAPTION=”ESRI Custom
 Tags”  ICON=”Images/Custom.bmp”>
<E CAPTION=’CF_ARCIMS’  VALUE=’<CF_ARCIMS
 action=”” servicename=”” servername=”” serverport=””’ HELPFILE=’Docs/CFMLTags/ArcIMSColdFusion.htm’>
</CAT>
Save the file and close the text editor.
The toolbar contains six buttons for working with the new ArcIMS elements: <CF_ARCIMS>, <CF_ARCIMS_LAYER>, <CF_ARCIMS_SQL>, <CF_ARCIMS_MULTIPOINT>, <CF_ARCIMS_POLYLINE>, and <CF_ARCIMS_POLYGON>.

Click the <CF_ARCIMS> button. A dialog box opens presenting all the element attributes.
Set the tag parameters. Click Apply to see the tag code created in the page.
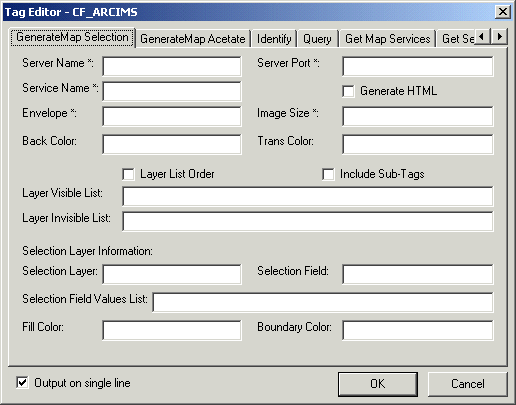
The tabs across the top represent the different values of the ACTION attribute of the <CF_ARCIMS> element. For example, the element code for the Generatemap action might look like this.
<CF_ARCIMS ACTION=”GENERATEMAP”
SERVERNAME=”bear”
SERVERPORT=”5300"
SERVICENAME=”SanFrancisco”
ENVELOPE=”-122.46,37.76,-122.42,37.79"
IMAGESIZE=”400,400"
LAYERLISTORDER=”true”
GENERATEHTML=”true”>
</CF_ARCIMS>
Close ColdFusion Studio.
For information on using the ColdFusion Connector, see Customizing ArcIMS—Using the ColdFusion Connector.