
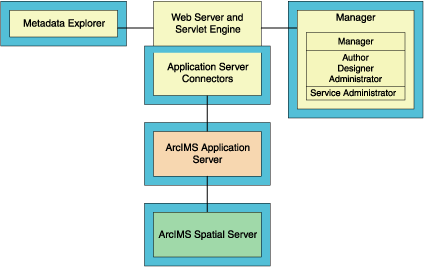
In this installation scenario, your Web site uses the resources of one computer; Web server software and ArcIMS are installed on the same computer. This configuration is useful for those with limited resources or light server loads. If you are new to ArcIMS, start with this installation and install the pre-selected features; referred to as a typical installation. The main ArcIMS features installed with a typical ArcIMS installation are highlighted in the diagram below. Note: All Application Server connectors are not installed; by default a typical installation installs the Servlet Connector. A typical ArcIMS installation assumes that your machine has met system requirements, and a Web server and servlet engine are installed and communicating. For more information on these features see the Overview and ArcIMS site configuration topics. You can access Manager remotely from any computer using your Internet Explorer web browser; you only need one Manager per ArcIMS web site.
The ArcIMS Host is considered to be the ArcIMS Manager, Application Server Connectors and ArcIMS Application Server. The ArcIMS Host is typically installed on the Web server machine. A typical ArcIMS installation, as described below, will install the ArcIMS Host and ArcIMS Spatial Server on the same machine as your Web server.
Obtain an authorization file for the machine you will install ArcIMS on. ArcIMS Spatial Server requires an authorization file for use.
Verify that your site meets the system requirements. For system requirement information see Step 1: Verify system requirements
Log in as a user with administrative privileges.
Ensure that a TEMP variable is set to a valid folder where you have write access and space available.
Close all applications on your computer.
Insert the ArcIMS CD into the CD drive to automatically launch the setup program.
|
Tips
|
Spatial Server (and ArcMap Server) require an Authorization File. Each machine installing this feature will require a unique authorization file. For information on obtaining an authorization file, see the topic To obtain an authorization file.
If you installed ArcIMS Spatial Server or ArcMap Server, the post installation option ArcIMS Authorization will configure your machine using the authorization file you received from Customer Service.
During the installation you will be asked to read the license agreement and accept it, or exit if you don't agree with the terms.
The ArcIMS install allows you to select the features you would like to install.
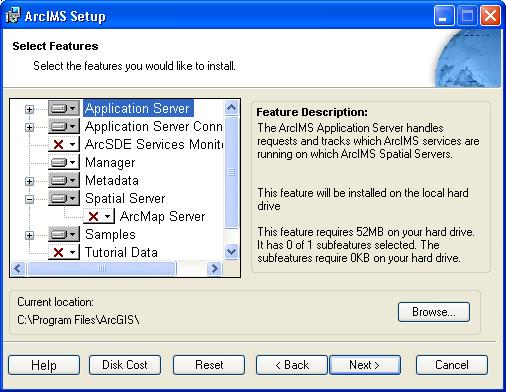
By default the features of a typical ArcIMS installation are selected to be installed. A typical installation includes the features most commonly installed on one machine. The main features installed with a typical ArcIMS installation are highlighted in the diagram above (note: All Application Server connectors are not installed; by default a typical installation installs the Servlet Connector). For more information on these features see the Overview and ArcIMS site configuration topics.
The ArcIMS installation consists of a collection of features and sub-features. An example of a feature is Spatial Server, which consists of a sub-feature, ArcMap Server. Many ArcIMS installation features contain sub-features. Features consisting of sub-features will have a + or a - sign to their left. The + sign will expand the feature so that you can view its sub-features. The - sign will collapse the list of sub-features. To install other features see Installing ArcIMS overview. To install features at a later time see Adding additional installation components.
To complete the installation, follow the directions on the screen.
Complete the post installation setup
After completing the ArcIMS installation, you will be provided with the opportunity to begin the post installation setup. The following ArcIMS post installation options are required to successfully complete a typical ArcIMS installation:
ArcIMS Authorization Configuration
Web Server-Servlet Engine Configuration
Configure System J2SE JRE (if a system J2SE JRE version 1.3.1 or higher is not detected on your system).
If you select a typical post installation setup these post installation options are automatically selected. See The Post Installation topic for information on the post installation setup.
Before you begin ArcIMS, if you did not choose to automatically configure your Web server-Servlet Engine in the post installation, you must complete Step 4: Configure your Web Server, either manually or by running the post installation setup again.
|
Tip
|