
After installing ArcIMS, you must create virtual directories for Manager, Output, and Website. A virtual directory is a mapped location on the Web server to a physical path.
Note: If you browsed to the location of your Web server root directory to create directories for Output and Website during ArcIMS post installation setup, you donít need to create virtual directories for Output and Website.
For IIS 4.0, click Start > Programs > Windows NT Option Pack > Microsoft Internet Information Server > Internet Service Manager. Expand your localhost name.
For IIS 5.0, click Start > Settings > Control Panel > Administrative Tools > Internet Services Manager. Expand your localhost name.
For IIS 5.1, click Start > Internet Information Services. Expand your local host folder and expand Web Sites.
Click Default Web Site to highlight it.
Click Action in the toolbar.
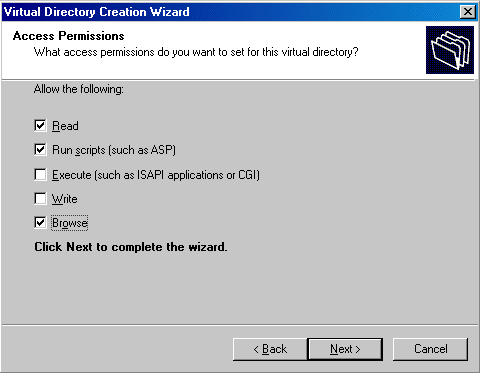
From the dropdown menu, point to New and click Virtual Directory. The Virtual Directory Creation Wizard displays. Click Next.
Type the following for the alias: Manager and Click Next.
Click Browse to select the ArcIMS Manager directory at <ArcIMS Installation Directory>\ArcIMS\Manager, and click Next.
For IIS 4.0, check Allow Directory Browsing and click Finish.
For IIS 5.0 and IIS 5.1, check Browse and click Next. Click Finish.

Manager appears in the virtual directory list.
Now create virtual directories for Output and Website.
Note: If you browsed to the location of your Web server root directory to create directories for Output and Website during ArcIMS installation, skip to step 18.
Click Default Web Site to highlight it.
Click Action, point to New, and click Virtual Directory.
Type the following for the alias: output and Click Next.
Click Browse to select the ArcIMS output directory located where you placed it during installation, for example, C:\ArcIMS\output. Click Next.
Check Allow Directory Browsing or Browse, click Next, and click Finish. Output appears in the virtual directory list.
Click Default Web Site to highlight it.
Click Action, point to New, and click Virtual Directory.
Type the following for the alias: website and click Next.
Click Browse to select the ArcIMS Website directory located where you placed it during installation, for example, C:\ArcIMS\website. Click Next.
Check Allow Directory Browsing or Browse and click Finish. Website appears in the virtual directory list.
Change file security for your servlet engine:
a. In the left panel, click Scripts for JRun. In the right panel, right-click jrun.dll for JRun, and select Properties.
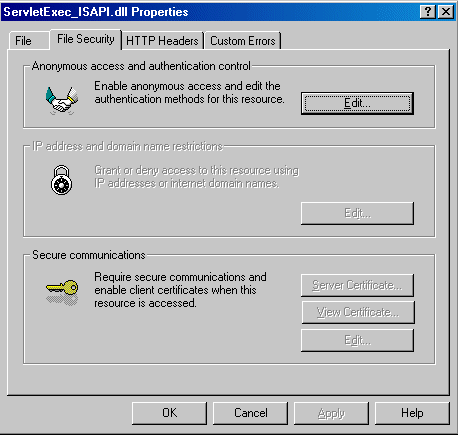
b. In the left panel, click Scripts for ServletExec. In the right panel, right-click ServletExec_ISAPI.dll, and select Properties.
c. In the left panel, click jakarta for Tomcat. In the right panel, right-click isapi_redirector.dll for Tomcat, and select Properties.
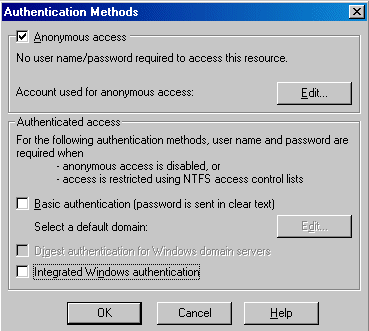
Click the File Security tab and click Edit to change the Anonymous access and authentication control.

Make sure Anonymous access is checked. For IIS 4.0, uncheck Windows NT Challenge/Response and click OK; for IIS 5.0 and 5.1, uncheck Integrated Windows Authentication and click OK.

Click OK on the properties window.
Close the console window. If prompted to save console settings, click Yes.
See Step 5: Configure ArcIMS for the final step required to get ArcIMS running.